Adding light/dark mode splash screen in React Native

Splash screen is the initial screen that pops up while your apps load. A splash screen sets up the stage for your app while allowing it the time to load the initial contents. This article is to help you configure the splash screen on your next app in a very easy way. We will use react-native-bootsplash to add splash screen in our app.
- Install the dependency
$ yarn add react-native-bootsplash
$cd ios
$ pod install- Generate assets
yarn react-native generate-bootsplash <logo-path> \
  --background-color=<background-color-code> \
  --logo-width=<logo-width>
iOS
- Edit AppDelegate.h
2. Add BootSplash.storyboard in Xcode
- Open the .xcworkspace file in Xcode.
- Drag and drop the BootSplash.storyboard file from Finder into Xcode file organiser.

- Select Create folder references & click on Finish.

- In Targets > Project > General Tab, select Bootsplash in Launch Screen file

Android
- Update android/build.gradle
2. Update android/app/build.gradle
3. Update android/app/src/main/res/values/styles.xml
4. Edit AndroidManifest.xml
5. Update MainActivity.java
Hide your splash screen
import RNBootSplash from "react-native-bootsplash";

RNBootSplash.hide(); // immediate
RNBootSplash.hide({ fade: true }); // fade
That’s all for adding the splash screen. Now run your app to see the splash screen in action : )
Supporting Dark mode
Important note: Splash screen theme depends on the system default theme. To test splash screen dark mode change the device system theme to dark mode.
Android
- Update android/app/src/main/res/values/colors.xml
2. Add a new file android/app/src/main/res/values-night/styles.xml
iOS
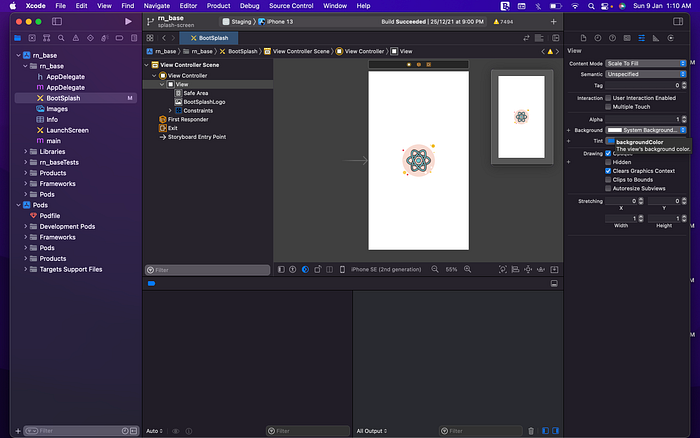
- Open your project in Xcode.
- Set Bootsplash background color to System Background Color.
Voila! Our splash screen now supports Dark mode too.
Thanks for reading.
I hope you enjoyed this article and it helped you in some way.
More articles to come. Stay tuned.
You can find the code for this tutorial in this repo.
Also, find me on LinkedIn.